
Beginners Guide To Photography
In the midst of #coronavirus, I know most of us have significantly more time on our hands. I think it’s also a safe bet that most people have a camera sitting around their house that they barely use or have always wanted to use more. What a better time to learn photography than now? Whether its your kiddos, pups, flowers in your garden, the view from your home etc… there’s inspiration around all of us.
I’m going to break this down as if I were teaching a friend who wanted to be able to take photos they were proud of with the camera that’s been sitting in their closet for some time. My goal is you have a basic understanding of operating your camera and that your photos don’t require a lot of editing, because it’s always best to get it right “in camera”.
Read your manual. I know, I know. NOT the fun part. You don’t have to dissect it, but you need to understand how to turn it on & off, how to toggle into manual mode, what adjusts shutter speed / aperture / ISO, how to format your memory card, how to focus, which button takes the photo (controls your shutter) and how to preview the photos you have taken. Phew, sounds like a lot. But these are the controls you will need to grasp in order to shoot manual and they are different for every camera.
Before you start, make sure your batteries are charged and you have formatted your memory card. Attach your lens to your camera. I shoot with all prime lenses, which mean they are a fixed focal length such as 50mm or 35mm. For this purpose, it doesn’t matter if your lens is a zoom or a prime. We won’t discuss much about the lens so pick a focal length and stick with it. Don’t worry about zooming in and out. I would rather you learn to move yourself around your object to get a better angle than limiting yourself to zooming.
Composition: Rule of Thirds. Imagine as you are looking through your lens, the image you are about to take is divided into thirds both vertically and horizontally. Where the lines intersect is where your eyes are naturally drawn to. When composing your image, try to place objects / subjects on or near those points.

There are three main aspects you can control while shooting manual. Aperture, Shutter Speed and ISO. These all have to function together and play off each other in order for your image to be properly exposed, meaning not too dark or not too light. First step, refer to your camera manual to find where your light meter is in your viewfinder. This is important, as it helps you monitor your exposure while you are adjusting Aperture, Shutter Speed and ISO. You want to keep your light meter near zero or slightly under exposed, near the -. This is because when you are shooting digital, it is easier to recover the darks of your image than the lights / highlights.
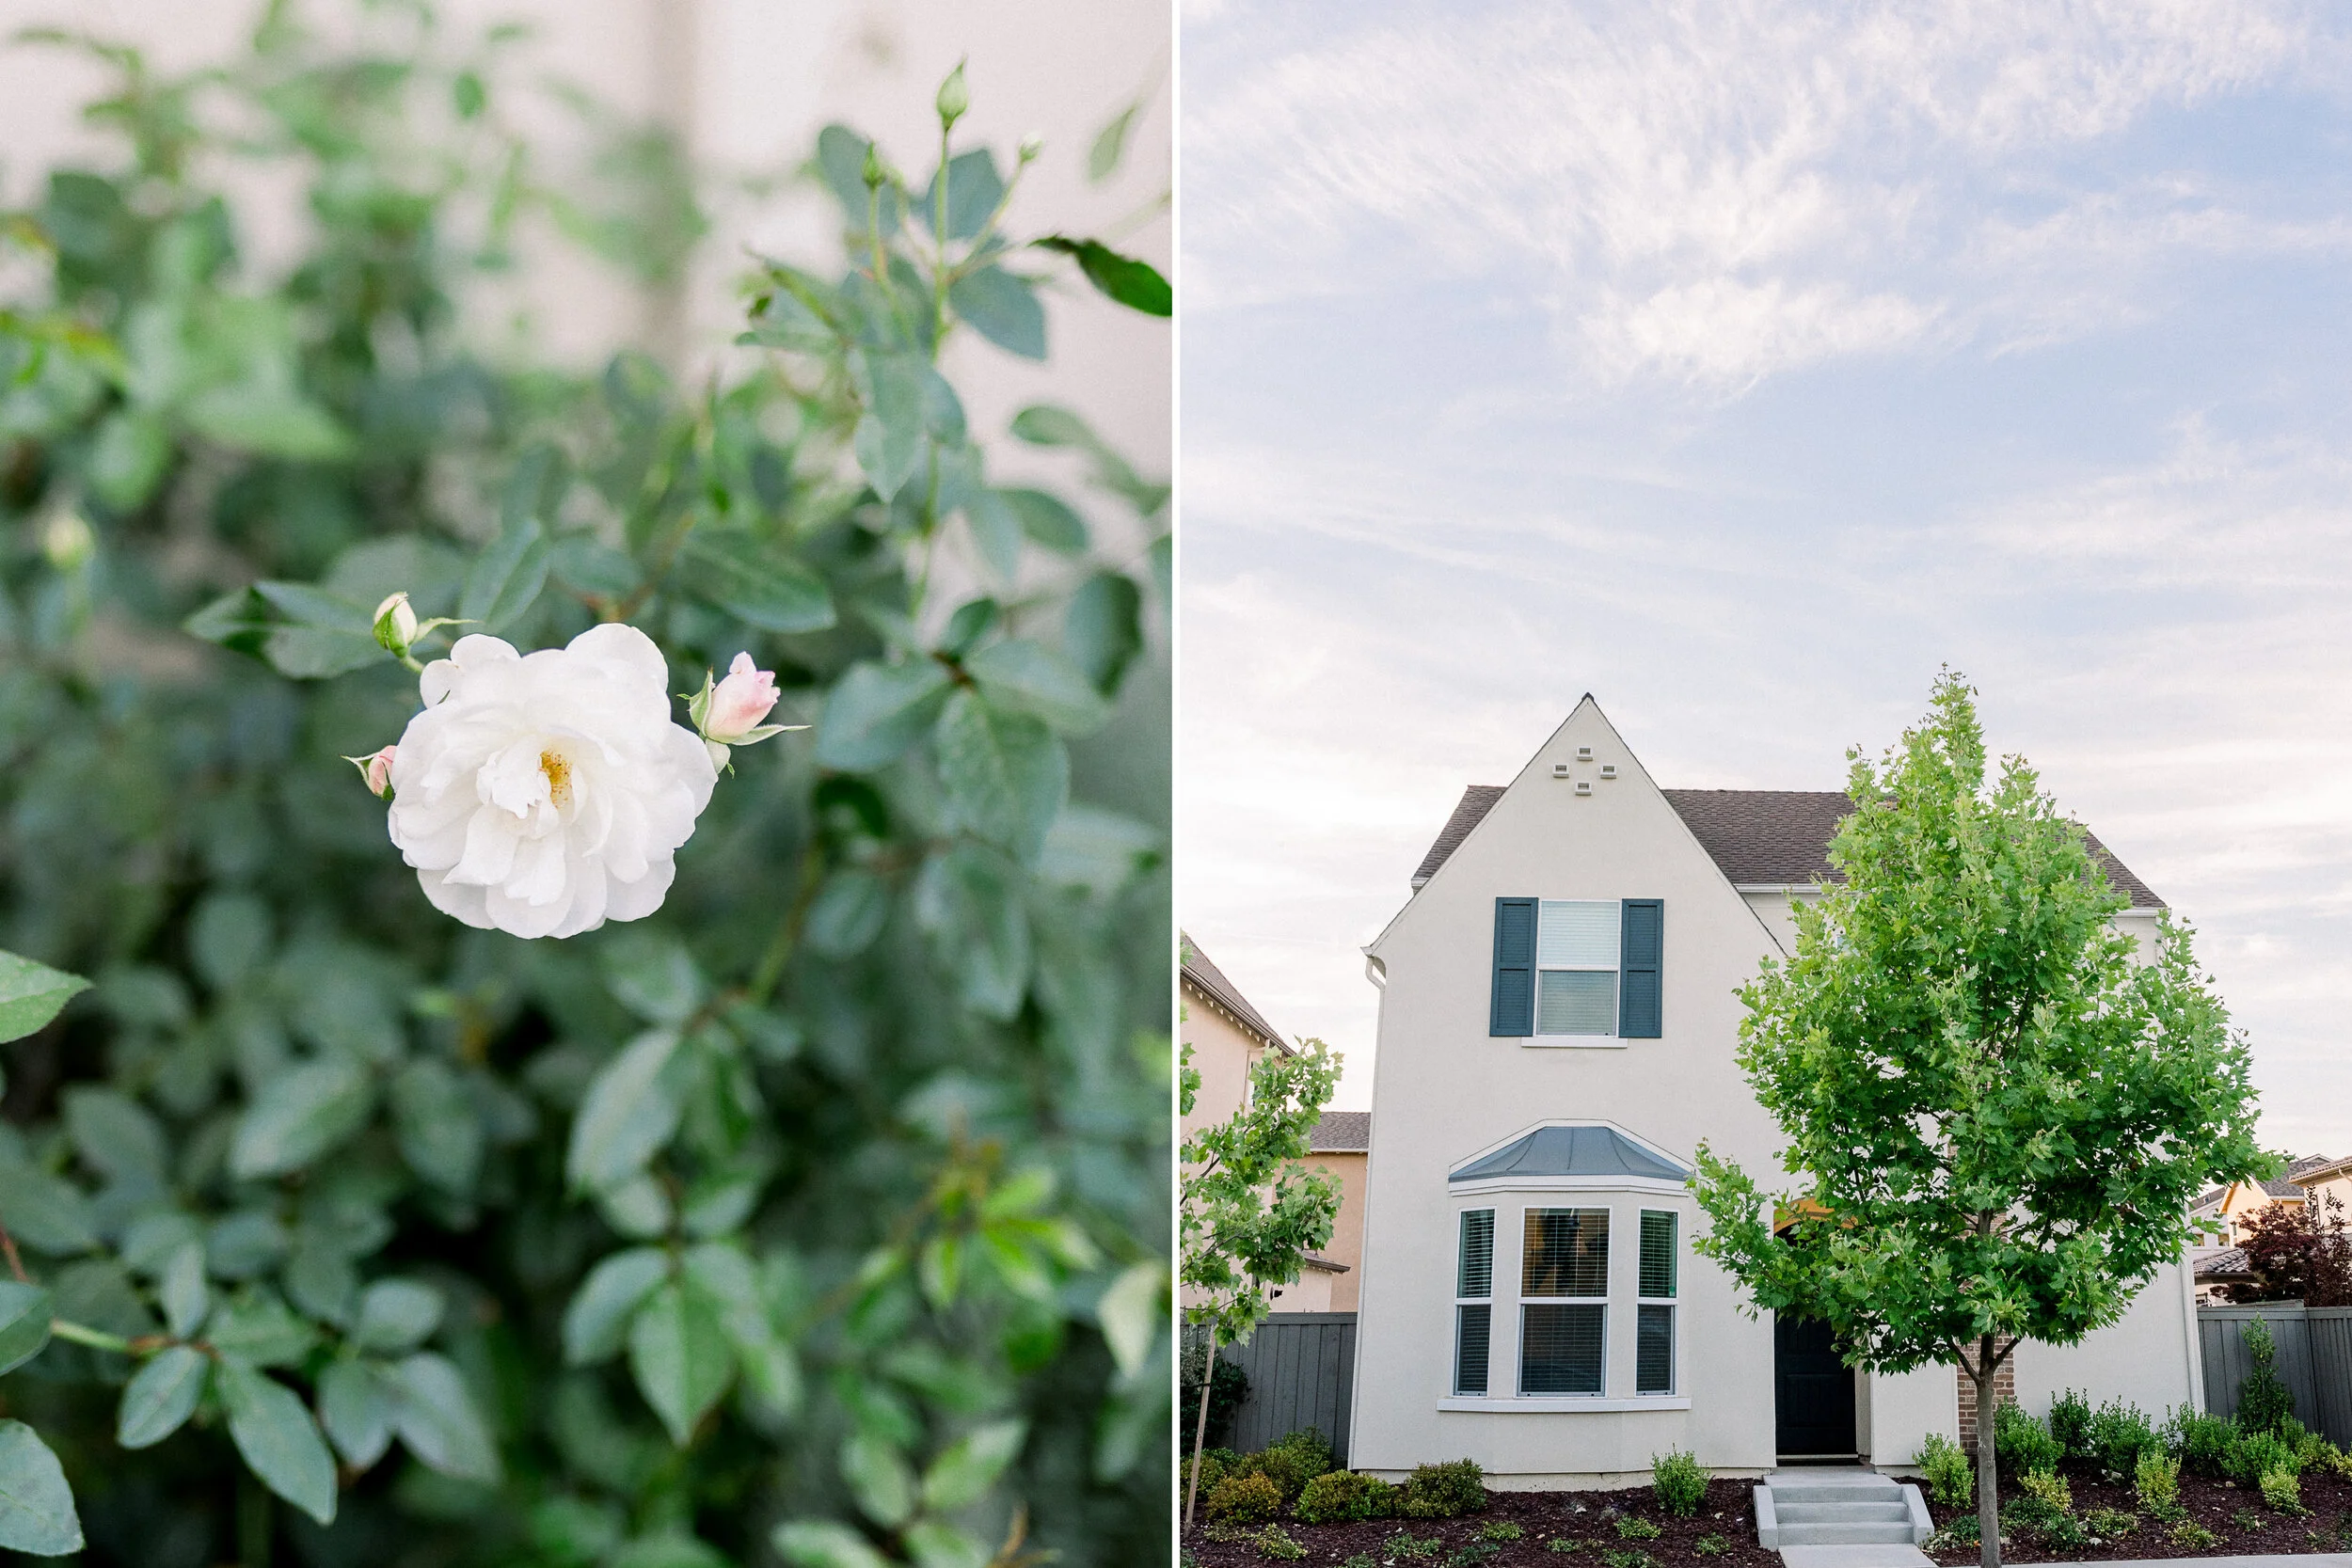
Aperture: can be defined as the opening in a lens through which light passes through to enter the camera. Think of it paralleling your pupils, you squint to allow less light in when it’s bright outside and do the opposite when your surroundings are very dark. In addition to controlling the amount of light your lens allows in, aperture also controls the depth of field in your photos, which is the distance between the closest and farthest objects that appear sharp. A shallow depth of field will only allow for a small portion of the photo to be in focus while a large depth of field will allow for objects close and far to be in focus. Aperture correlates with a f-stop number, f/1.4 or f/16 for example. This is where things can get slightly confusing… a “large or wide” aperture is the lowest number / f-stop your lens allows. An aperture of f/1.4 (for example) will allow the most light in and open up your lens. This large aperture will create the smallest depth of field, meaning only what you focus on will be crisp. Conversely, an aperture of f/16 will close down your lens, only allowing a very small amount of light in. This small aperture (think about the opening of your lens), increases your depth of field. If you are standing in front of a vast mountain range, you might squint to focus on the mountains in the distance. Below are two examples of different apertures. The image on the left is shot at f/1.4. The rose itself is the only part of the picture in focus. The stem and leaves are blurry. Small depth of field, larger aperture. The image on the right is shot at f/8.0. The house, tree, sidewalk and sky are all in focus. Large depth of field, smaller aperture.
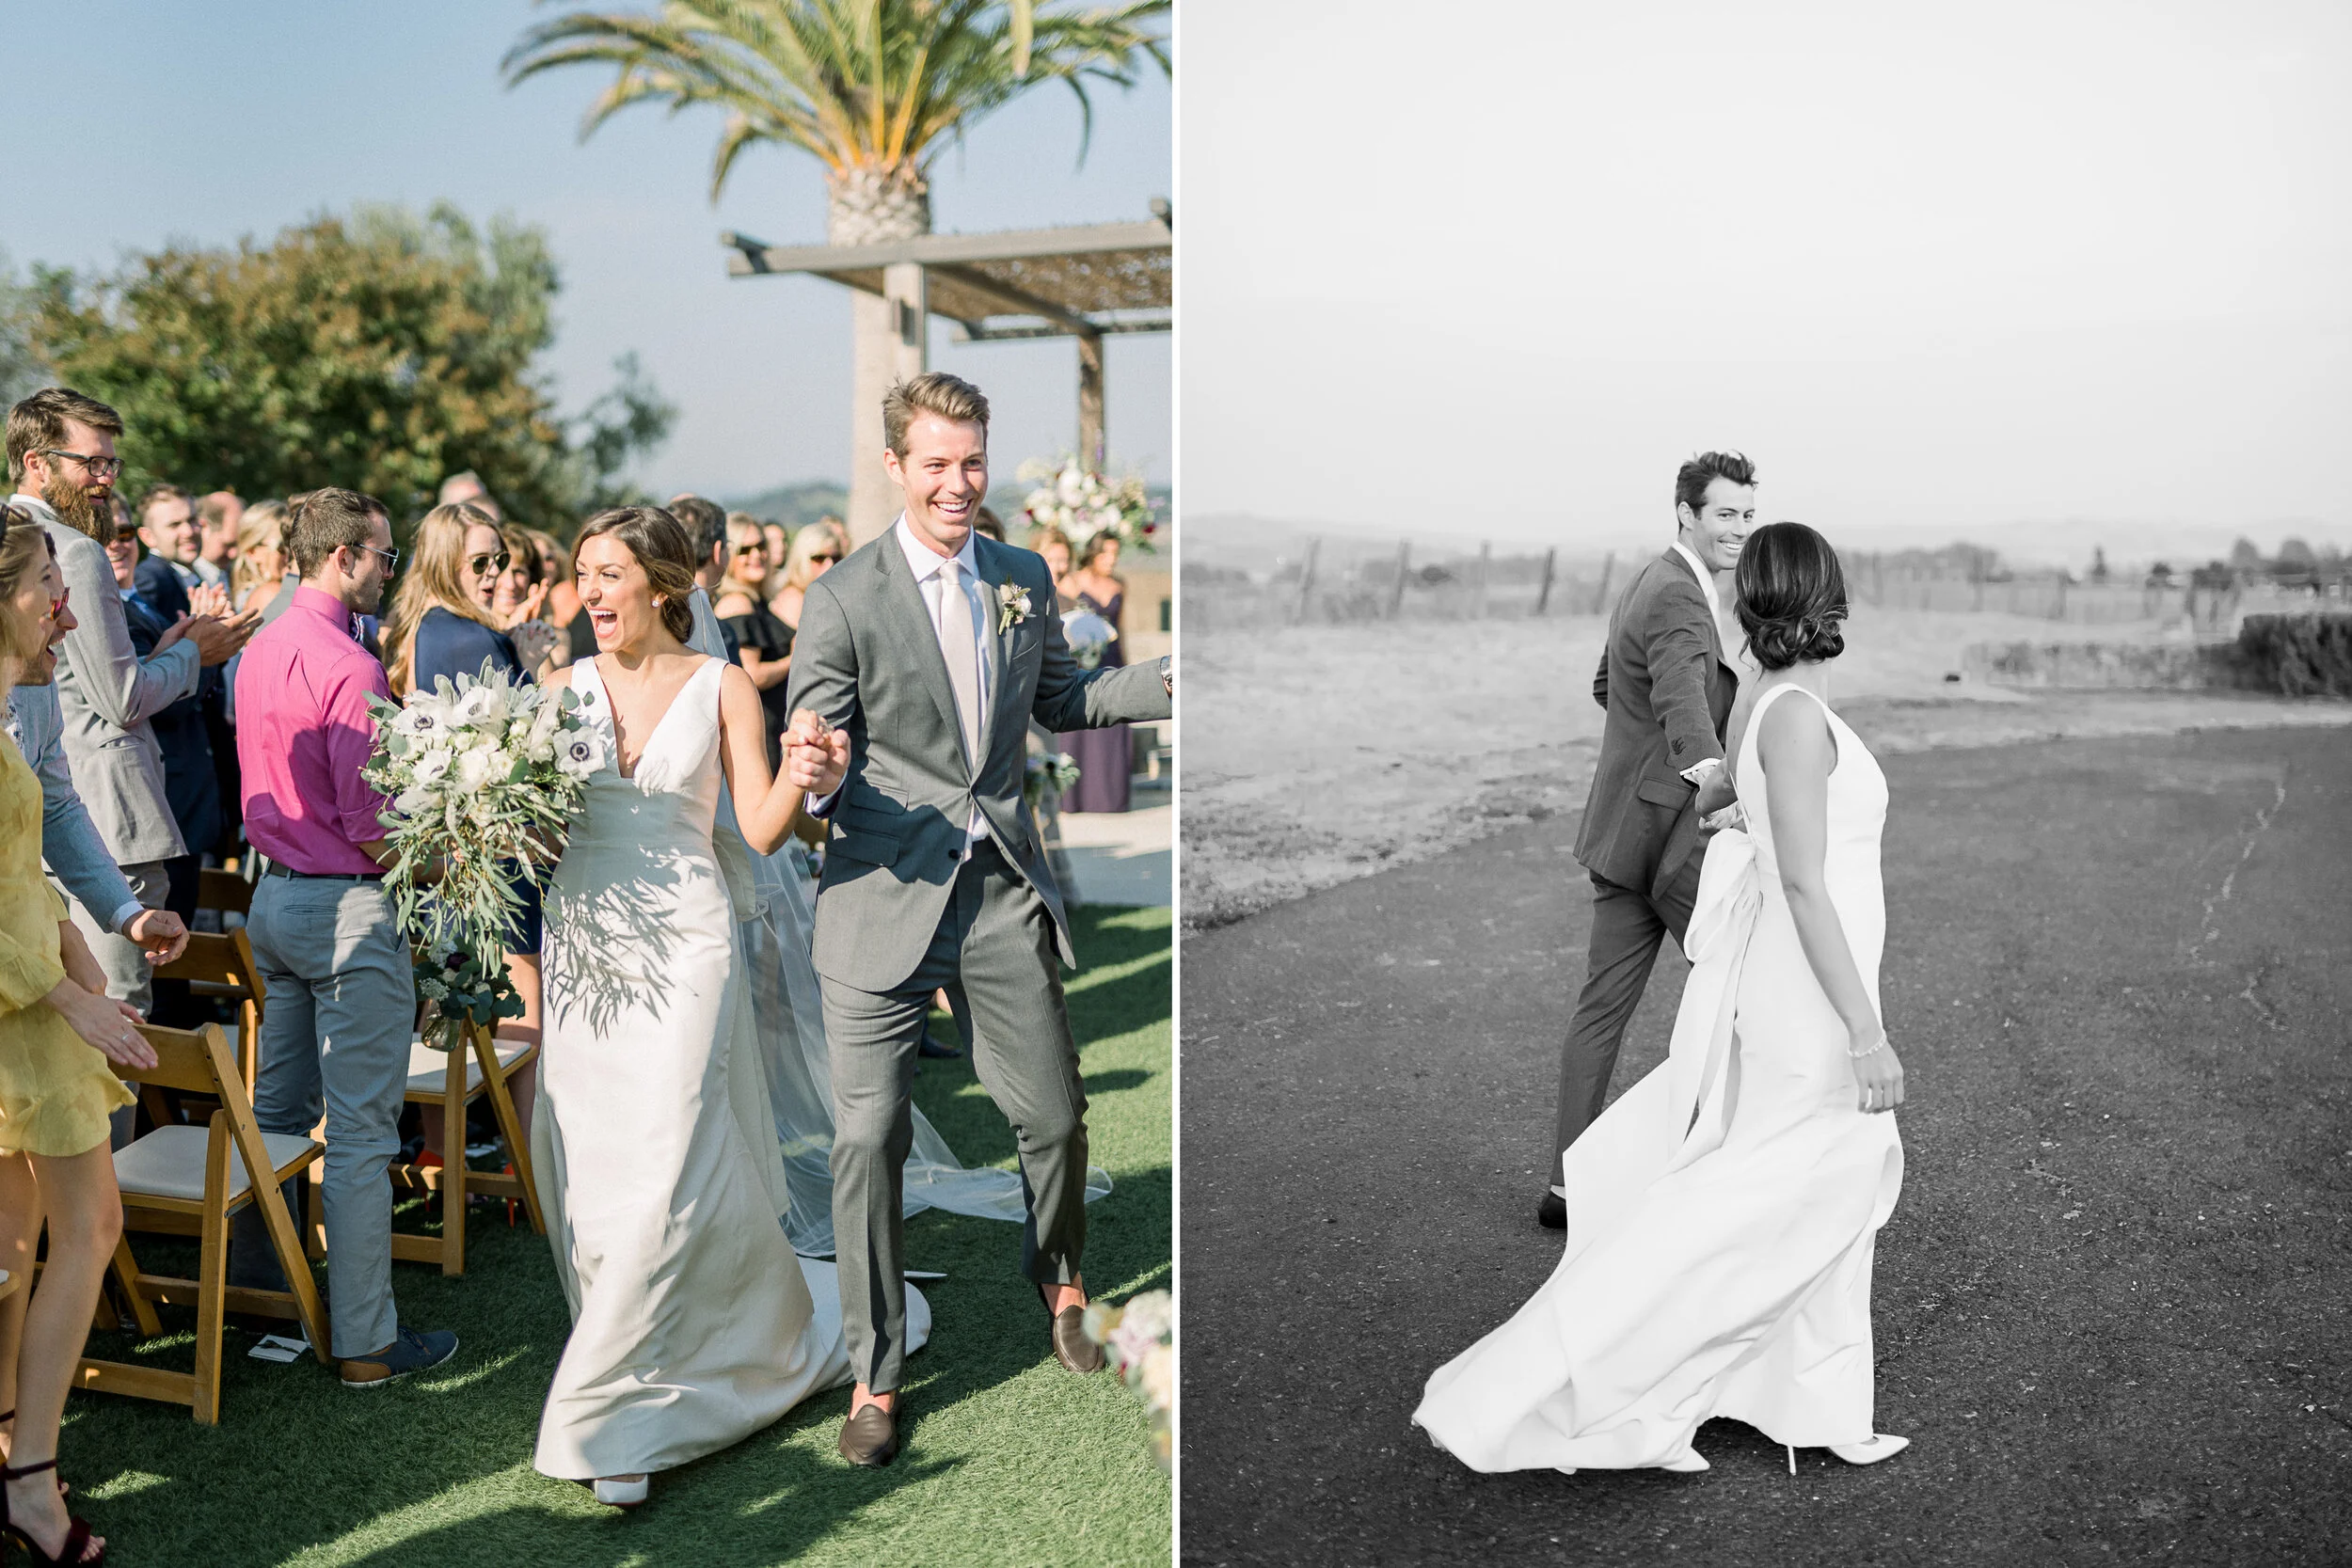
Shutter Speed: is the length of time in which the camera’s shutter opens and closes. The shutter is closed until you “fire” it, pressing the button to take a photo. Once it opens, it fully exposes the camera’s sensor to the light that has passed through your lens. Shutter speed is measured in fractions of a second but can also stay open for longer, such as 30 seconds. For example, 1/320 means the shutter is open for one three-hundred-twentieth of a second. Along with exposure, shutter speed also controls the amount of movement you see in your photos. A longer shutter speed exposes the camera sensor for an increased period of time. Therefore, if your subject is moving while the shutter is open, the sensor will capture that movement and it will show up as motion blur. Long or slow shutter speeds can also be used to allow more light into your lens. Low light situations such as a dark room indoors, outdoors after dusk or if trying to capture the Milky Way in pitch black would warrant shooting with a slower shutter speed. Fast shutter speeds have the opposite effect in both examples. On a bright day when shooting outside, you will need a fast shutter speed to avoid blowing out / allowing too much light in to the sensor. Below are two examples of how shutter speed can effect your overall image. The image on the left was shot in the middle of an afternoon in the bright sun. Shutter speed here is 1/4000 which is the fastest my camera is capable of. The image is crisp, you don’t see any motion blur and the highlights (lightest part of the image) aren’t blown out. The image on the right was shot just after sunset with a shutter speed of 1/320. Since there was not as much natural light present due to the time of day, a longer shutter speed is needed to properly expose this image. It’s not overly obvious, but there is also some motion blur present in the image on the right as seen in her dress.
ISO: an acronym for International Organization for Standardization, it is responsible for simply brightening or darkening your photos. Increasing your ISO will result in brighter images. Decreasing ISO will result in a darker overall image. Another way to think of it is your ISO number is the amount of help you need to let light in / brighten your image. If it is already bright outside and you are shooting in the sun, you don’t need much help and an ISO of 100-200 would be appropriate. If it is sunset, dusk or shooting indoors where not much natural light is present, you will need more help letting light in, therefore increasing your ISO. There is a draw back to cranking up your ISO too high; the resulting image will show a lot of grain, also known as noise. It’s not that the image won’t be clear or crisp, but think of the grain present in older photos or some film photos. It’s something to be aware of and to understand how it will effect your final image. Below are two examples of different ISO settings. The image on the left is shot in the afternoon with the sun peeking through. The ISO is 100 because there isn’t much need for the image to be brighter as the conditions already allow for it. The photo on the right was taken after dusk with an ISO of 5000. In real time, it was pretty dark outside with only a small amount of light coming from one corner of the sky. In this image you can also see the grain that is present due to a higher ISO.

Now that we’ve gone over the basics, how do you put it all together? It takes time and practice to get comfortable with mastering these settings and that’s ok. For me, there is a process that I go through to determine what my settings may be since they all play off one another. Aperture is my first priority when determining a setting, as it determines how much of the photo is in focus. Take the two photos of Stefanie above; the image on the left is shot at f/10. I wanted all of the rocks, Stefanie and the sun in focus. Extra tip: if shooting directly into the sun, a smaller aperture (again, think squinting) will cause the sun to have this starburst look to it. The image on the right was shot at f/1.8. I focused on her face and wanted only that to be crisp, while the background appeared blurry. The aperture of f/1.8 also helped me let more light in to my camera which was crucial due to the time of day and available natural light. Second priority is my ISO. I tend to like my images on the “light and airy” side therefore I want to make sure my image is bright enough. Lastly, I will adjust my shutter speed to help make sure my image is exposed correctly. I set the previous two settings and then, by checking the exposure in camera with the light meter, will adjust shutter speed accordingly to get the exposure as close to zero as possible. This is not the end all be all process, as there are different situations that would prioritize different settings. If you are doing sports photography, taking photos of your kiddos running around the house or wanting to see the movement of water pouring down a waterfall; you would prioritize shutter speed above all else. If you are shooting after sunset or after dusk, you will need to crank up your ISO and adjust other settings to allow enough light coming in.
Where to start? In the beginning, just focus on your photos having the proper exposure. Meaning, when you look at them in the back of your camera, they aren’t too dark or too light. Start with aperture and play around with taking photos that have one object vs the entire photo in focus. Next, keep your aperture and shutter speed at a certain setting and only adjust ISO to see how much brighter an image is. When toying with ISO, shoot indoors, then step outdoors to see how this will have to change in order to properly expose your image. Lastly, do the same with shutter speed, seeing the difference when taking photos in various lighting scenarios and also objects that are on the move such as kids and pets. Remember, when you change one setting, you will likely have to adjust the others for optimal exposure. Luckily, when shooting digital, it doesn’t cost extra money to take a bunch of photos that you will later delete. It’s the perfect way to begin learning.